
his is a basic guide to configure Exact Audio Copy (EAC) with preset profiles that will allow the choice of ripping Cd's and compressing the output to MP3 (190 VBR (APS), 245 VBR (APX) 256 CBR & 320 CBR (API)) and FLAC.
What You Need.
1.Download and install Exact Audio Copy, the version used here is eac-0.95b4. Do not start EAC just yet.
2.Download and install FLAC, version used FLAC 1.1.2.(IF YOU HAVE TO ENCODE IT TO FLAC)
3.Download LAME MP3 Encoder, unpack to a folder and move the folder to your Program Files folder, version used LAME MP3 Encoder 3.97 beta 2 do not use the alpha versions these are for test purposes only.
4.A clean unscratched audio CD, do not insert just yet.
Initial Setup.
This should take no more than a few minutes and only needs to be done once.
Configuration Wizard.
A: When you open EAC for the first time the Configuration Wizard window should pop up if not click EAC (Next to Edit) and select the Configuration Wizard.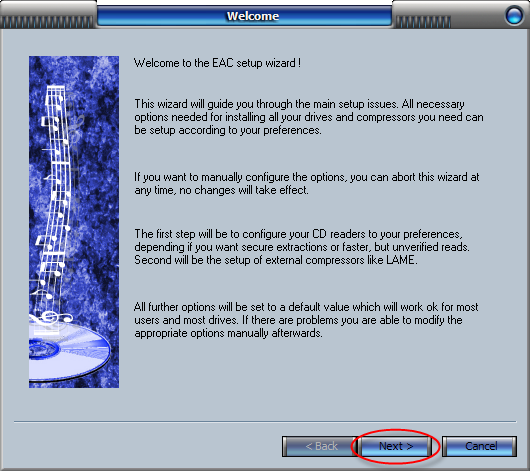
Click Next, you can pretty much click next for each step with the exception of the steps below where some input may be required.
B:Extraction Preferences window.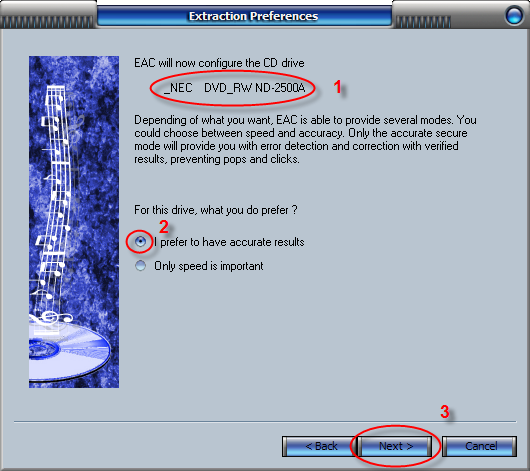
1: Your drive model should be indicated here.
2: Make sure that I prefer to have accurate results is checked.
3: Click next.
C: Encoder Configuration window.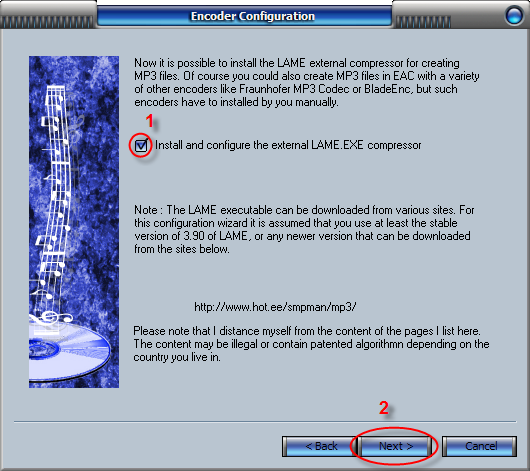
1: Make sure this is checked.
2: Click next.
Note: The Configuration Wizard will now search for Lame.exe
D: LAME Configuration window.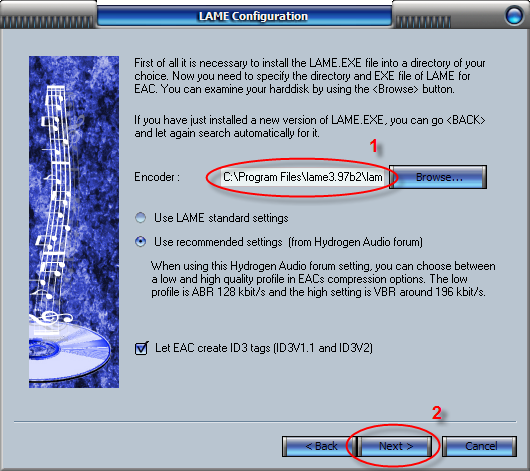
1: If the Configuration Wizard failed to find Lame.exe you can browse for the location.
2: If all settings are as shown here click next.
E: freedb Configuration window. freedb is a free database service to look up CD information which will allow EAC to automatically label your rips, EAC will need access to the internet to use this so you may need to set permissions with firewall etc..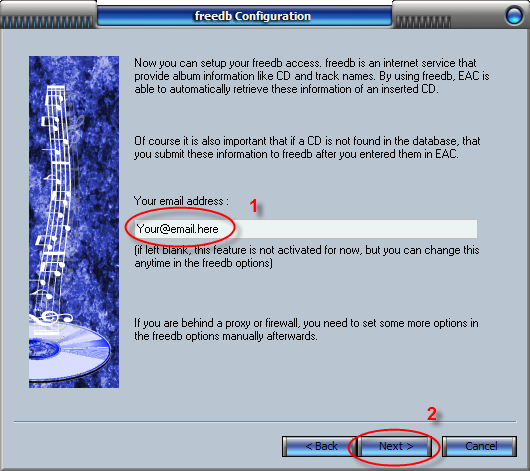
1: You will need to enter an email address here for access to the freedb database, the address does not have to be genuine but should have the format of a real email address.
2:Click Next.
F: Configuration Wizard Done window.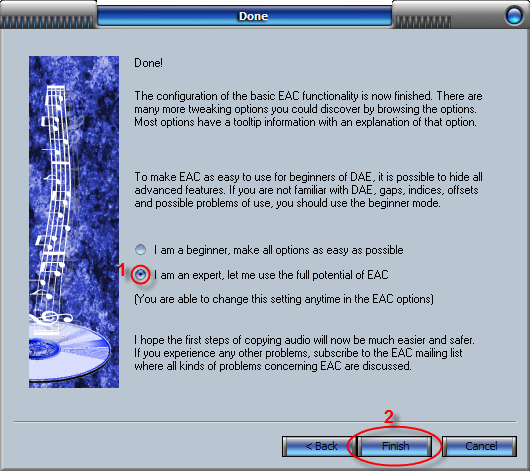
1: Check the expert option as this will give you access to additional settings.
2: Click Finish.
EAC Options.
Press F9 to bring up EAC Options. Note: No modification is required for the Catalog, Write and Interface so the are skipped.
A: Extraction Tab.
Only two options need to be checked here.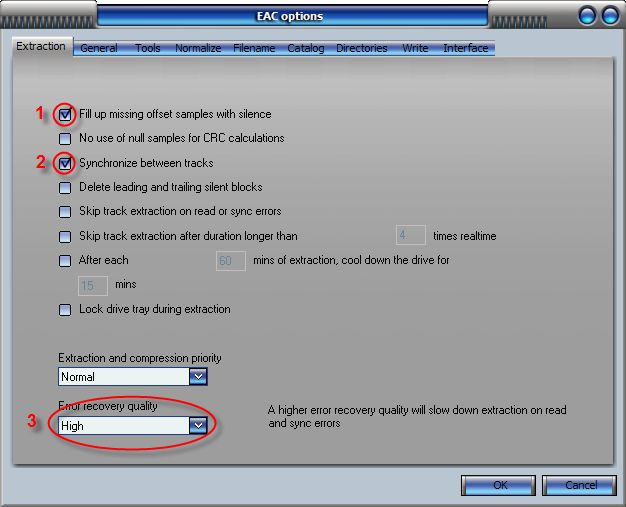
1: Check Fill Up Missing Offset Samples With Silence.
2: Check Synchronize Between Tracks.
3: Change Error Recovery Quality to High.
B: General Tab.
For the most part these settings have no part in accurate ripping and are more for personal preference, there are a couple that should be checked for automatic CD information.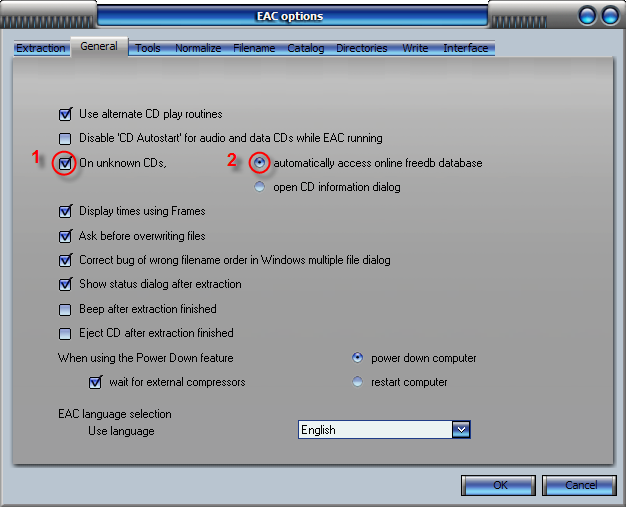
1: Check On Unknown Cd's.
2: Check Automatically Access On line freedb Database.
C: Tools Tab.
Just check that your settings match this image.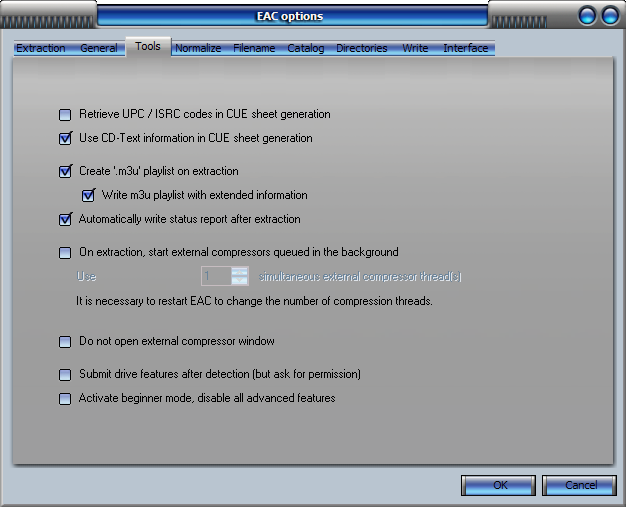
D: Normalize Tab.
The Normalize function should be unchecked. Note: Lossless ripping is not possible with this enabled.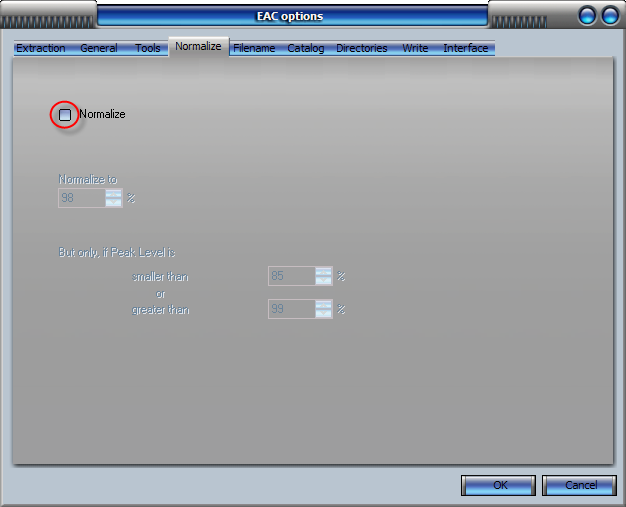
E: Filename Tab.
This is where you set up your chosen file naming convention.
%D\%C\%N - %T
This will extract tracks to folder Artist\CdTitle\ 01 - TrackTitle.Format
%D - %C\%N - %T
This will extract tracks to folder Artist - CdTitle\ 01 - TrackTitle.Format
If a .torrent file were created from this folder the name would include Artist and CD titles.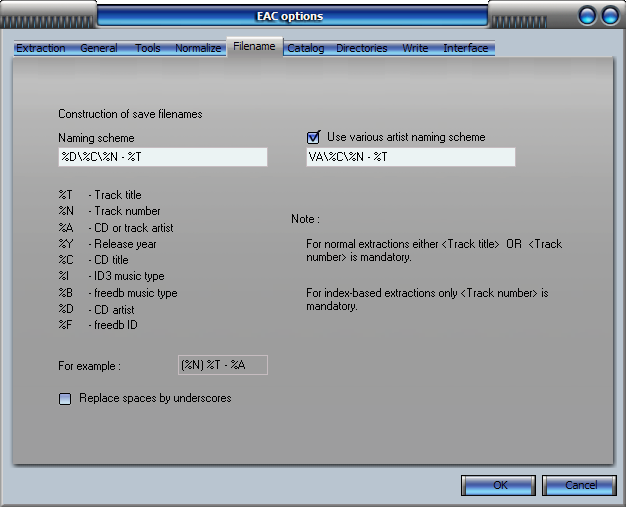
F: Directories Tab.
Use this option only if you want to extract files to a default directory, most people prefer to choose the extraction location and leave this option set to Ask Every Time.
Note: C:\Music\ is just an example and does not normally exist unless created by the user.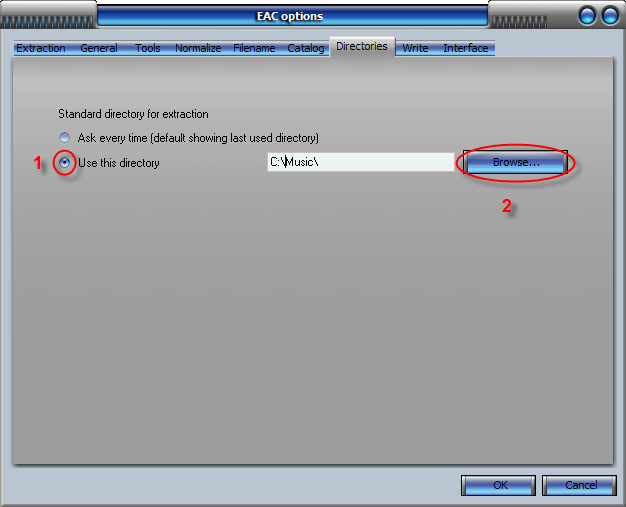
1: Select for default directory.
2: Browse for chosen directory.
Click OK
Drive Options.
Press F10 to bring up the Drive Options you will see an information window uncheck the Show this information next time box an click OK. This stage is just a tab at a time.
A: Extraction Method Tab.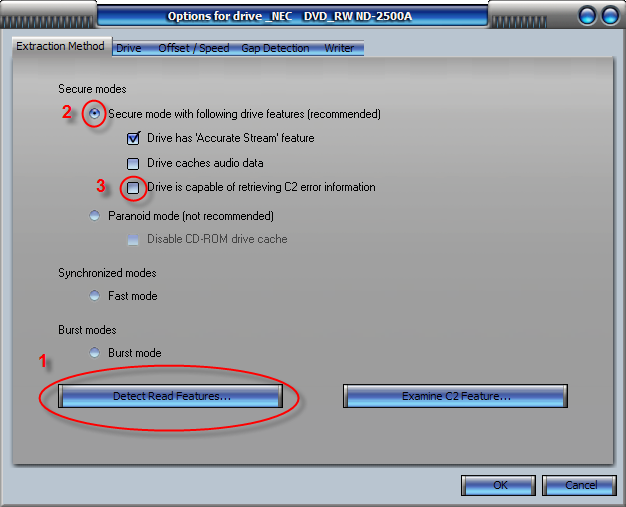
1: Detect Read Features, you can manually configure your chosen drive if it is not listed in the EAC internal database or you think that the settings are incorrect. Insert a clean unscratched CD into the drive a click Detect Read Features, how long this will take depends on the drive, during the analysis you will see a window similar to the one below when finished click Apply.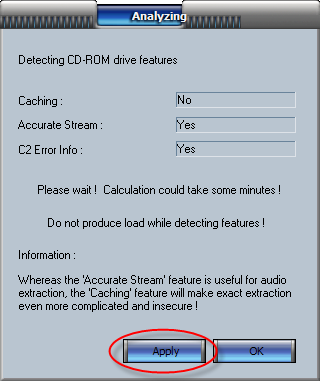
2: It is very important that Secure Mode is enabled.
3: Quite alot of drives support C2 error retrieval however the vast majority are not truly accurate, if you are unsure about the accuracy of your drive with respect to C2 error retrieval make sure it is unchecked.
B: Drive Tab.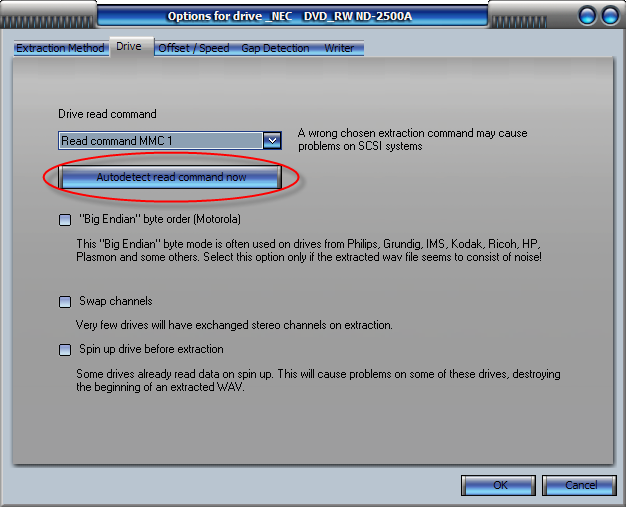
Still with the disc in the drive click Autodetect Read Command Now, the read command that it finds is the one we are going to use. Move on to the next tab.
C: Offset / Speed Tab.
The Read Offset Correction Value (+48) shown in point 2 is for an NEC - DVD_RW ND-2500A this is not the same value for all makes and model of drive.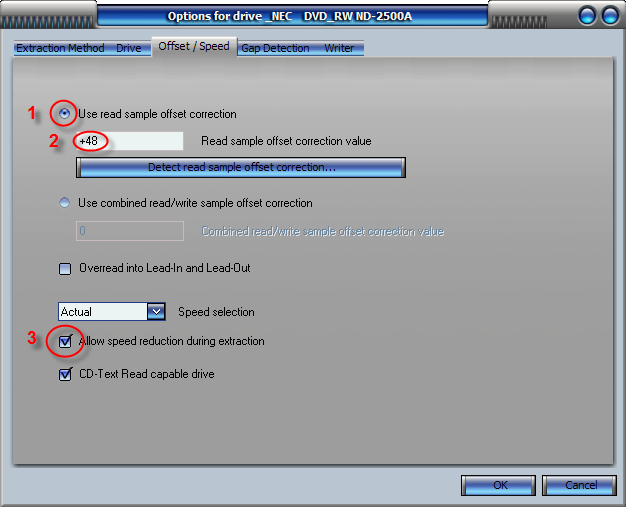
1: Check Use Read Sample Offset Correction.
2: Type offset value.
3: Check Allow Speed Reduction During Extraction.
Move to next Tab
E: Gap Detection Tab.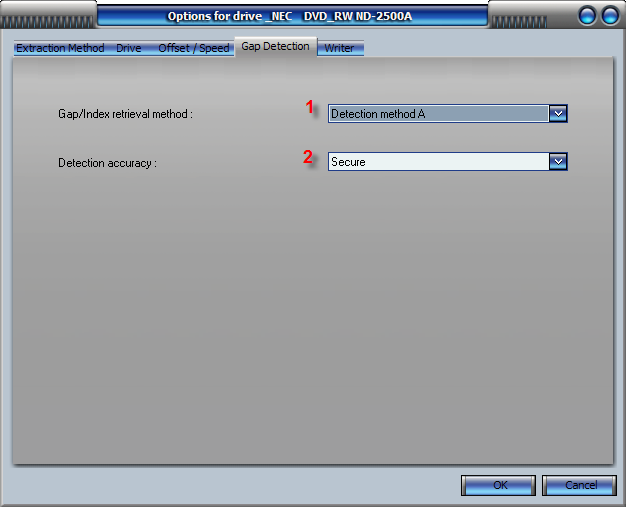
1: Detection Method A should be fine but if you drive cannot detect gaps then try B or C.
2: Set Detection Accuracy to Secure.
Click OK.
Profiles, (Encoder Configurations).
By configuring a few profiles and saving them it is quite simple to load the desired profile prior to ripping.
MP3, Lame.
These steps are repeated for each mp3 profile created.
Press F11 to bring up Compression Options.
A: External Compression Tab.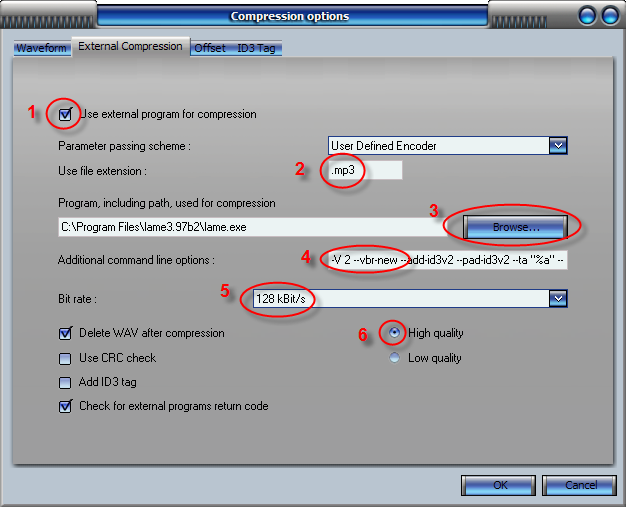
1: Check Use External Program for Compression.
2: Change Use file extension to .mp3 (including the dot).
3: Browse to find Lame.exe.
4: Additional command line options is where the the quality of the out put is set here are some suggested settings...
Equivalent to Alt Preset Standard (APS), variable bitrate (VBR) with a target of 190kbps, reasonable size for quality trade off.
-V 2 --vbr-new --add-id3v2 --pad-id3v2 --ta "%a" --tt "%t" --tl "%g" --ty "%y" --tn "%n" %s %d
Equivalent to Alt Preset Extreme (APX), variable bitrate (VBR) with a target of 245kbps, greater quality than above, slightly larger size and gaining popularity.
-V 0 --vbr-new --add-id3v2 --pad-id3v2 --ta "%a" --tt "%t" --tl "%g" --ty "%y" --tn "%n" %s %d
Constant bitrate (CBR) at 256kbps.
-b 256 --add-id3v2 --pad-id3v2 --ta "%a" --tt "%t" --tl "%g" --ty "%y" --tn "%n" %s %d
Equivalent to Alt Preset Insane (API), constant bitrate (CBR) at 320kbps, the best quality with a larger filesize.
-b 320 --add-id3v2 --pad-id3v2 --ta "%a" --tt "%t" --tl "%g" --ty "%y" --tn "%n" %s %d
5: Bit Rate can be ignored, the command line makes it redundant.
6: High Quality.
B: ID3 Tag Tab.
Check that the options are the same as this screen shot, click OK and save the profile as shown below.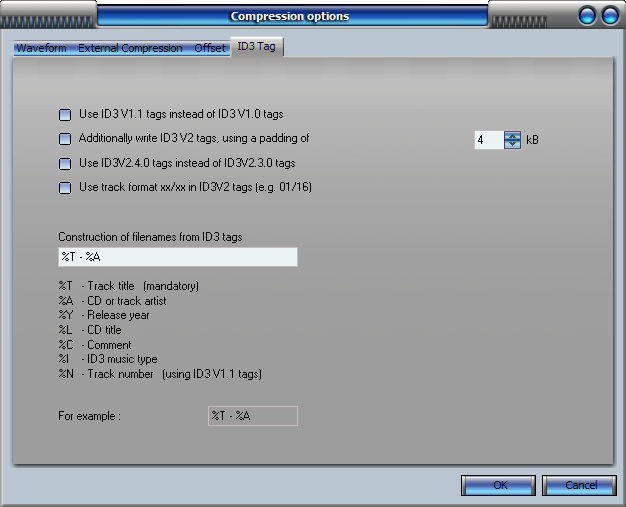
Saving Current Profile.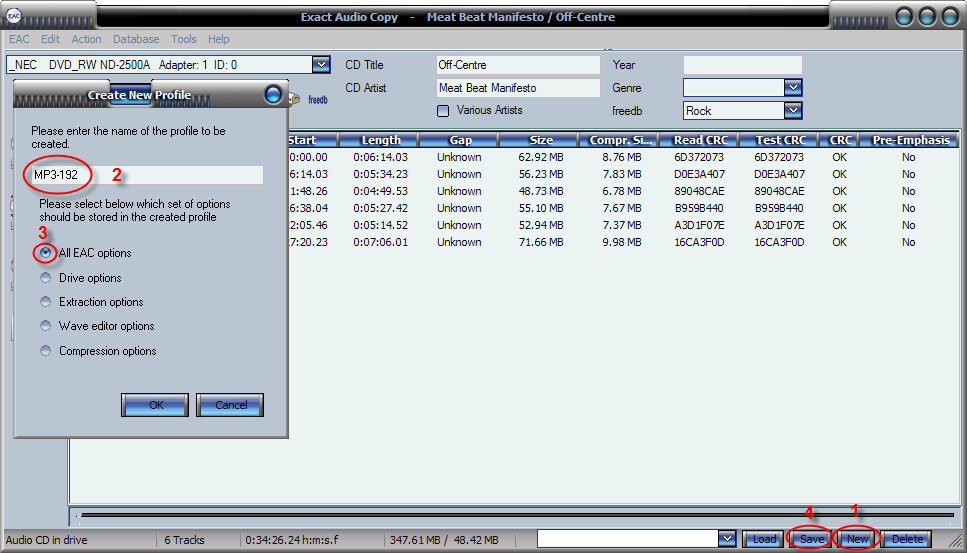
1: Click New.
2: Choose a name for the profile, a descriptive name will be useful when you have multiple profiles.
3: Make sure All EAC Options is checked and click OK.
4: Click Save
Flac Profile.
Press F11 again.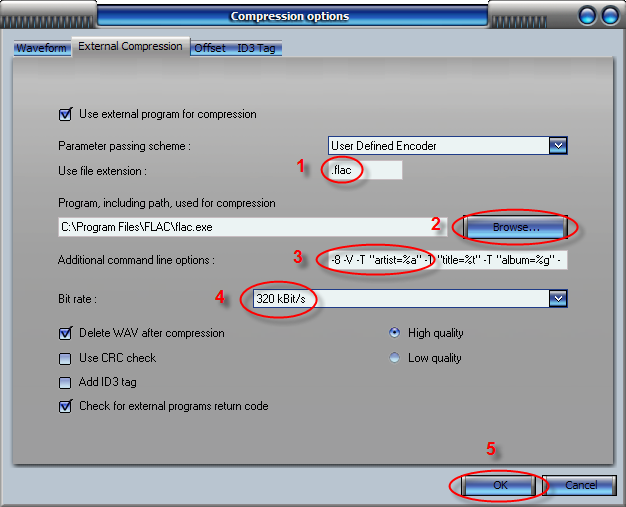
1: Change the used file extension to .flac
2: Browse for flac.exe which is the external compression program being used.
3: Change the Additional command line options to read..
-8 -V -T "artist=%a" -T "title=%t" -T "album=%g" -T "date=%y" -T "tracknumber=%n" -T "genre=%m" %s
4: Selected bitrate has no impact here.
5: Click OK and save the profile as shown above.
Ripping
1: Open EAC, insert CD and load your preferred ripping profile.
Note: a FLAC profile is being used in this example however if you just want the output as WAV files any of the preconfigured profiles can be used.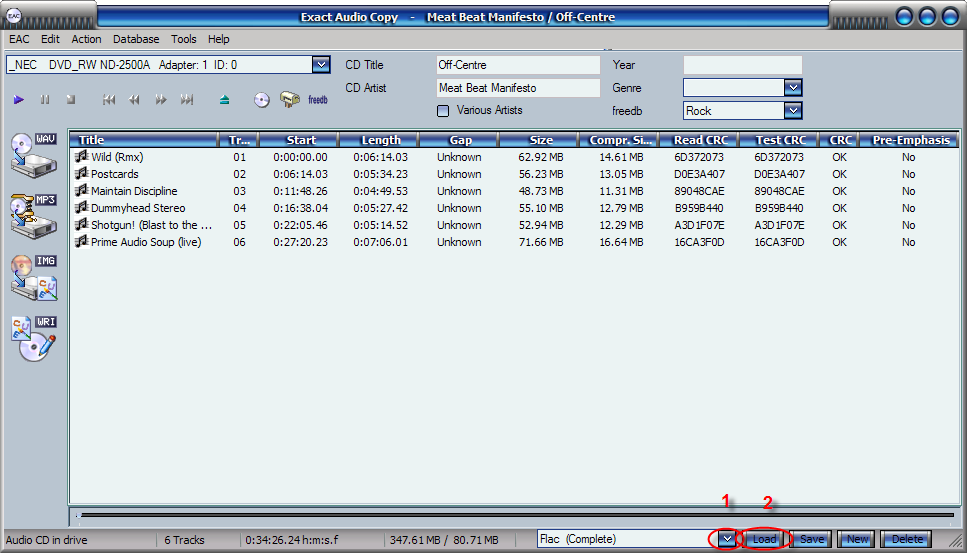
2: Click Action and Detect Gaps (or F4).
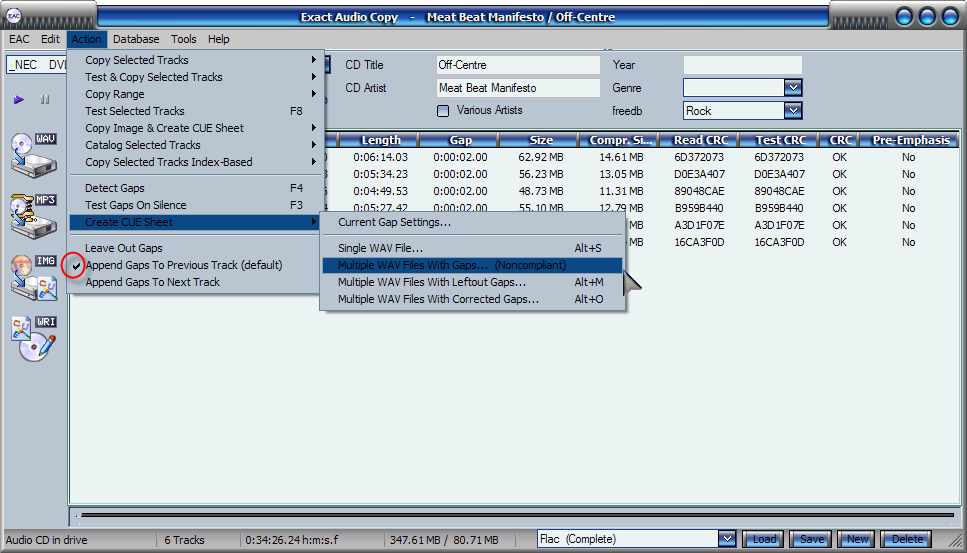
3: Click Action, Create Cue Sheet and Multiple WAV Files With Gaps (Noncompliant).
Note: This is a good point to check that Append Gaps To Previous Track is checked, it should be set as default.
![]()
This image has been resized. Click this bar to view the full image. The original image is sized 967x553.
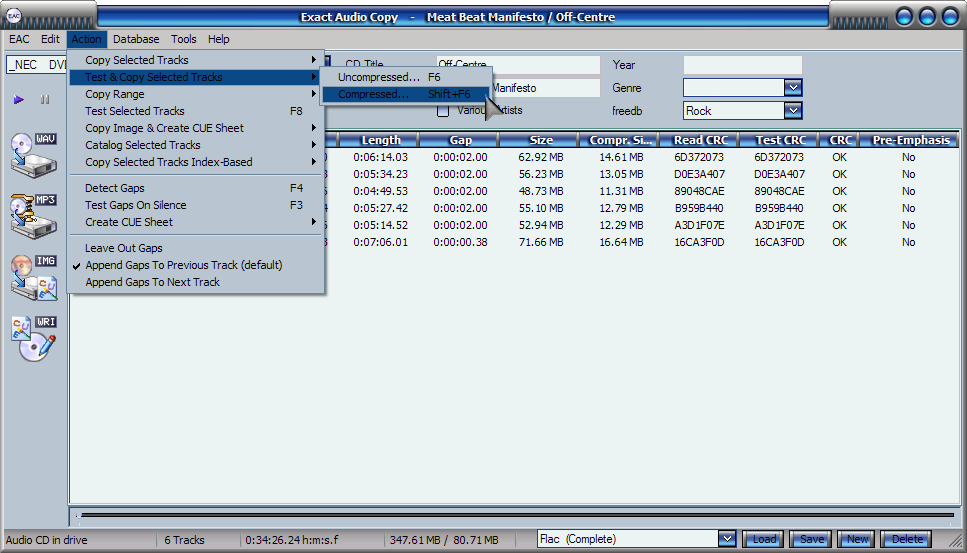
4: Click CTRL + A to select all tracks, Action, Test And Copy Selected Tracks and Compressed (Shift + F6).
Note: For WAV files select Uncompressed (F6).
![]()
This image has been resized. Click this bar to view the full image. The original image is sized 967x553.
5: During the extraction process you will see this window, when you see the Audio Extraction Complete message click OK and you are done.:icon_chee 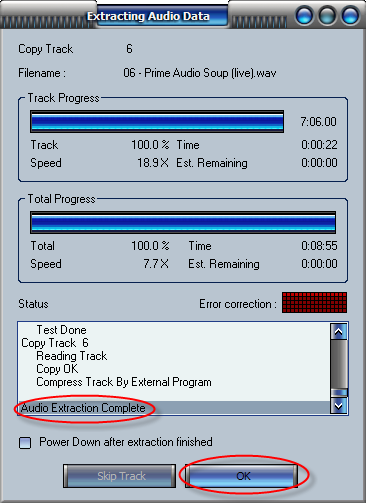
Note: Remember to check the .log file for any errors.
-------------------------------------------------
CBR 320 (Highest possible quality):
-------------------------------------------------
Code:
--alt-preset insane   (recommended as produces the best quality)
(bitrate: 320 kbps)
-------------------------------------------------
VBR (Variable Bitrate) settings:
-------------------------------------------------
Even Higher Quality
Higher Quality (Slower):
Code:
--alt-preset extreme     (recommended as produces the best quality)
(bitrates 220-270 kbit/s -- usually averages around 256kbps)

Faster (Very Slightly Lower Quality):
--alt-preset fast extreme
(bitrates roughly the same as above)

Very High Quality

Higher Quality (Slower):
--alt-preset standard
(bitrates 180-220 kbit/s -- usually averages around 192 kbps)

Faster (Very Slightly Lower Quality):
--alt-preset fast standard
(bitrates roughly the same as above)

Compromising, a little bit lower quality than pure standard, but less bitrate
(-Y: usually limited up to 16 kHz) :

--alt-preset standard -
-------------------------------------------------
CBR (constant bitrate) settings:
-------------------------------------------------
320 kbit/s CBR
Code:
--alt-preset cbr 320

note: --alt-preset cbr 320 is the exact same thing as --alt-preset insane


256 kbit/s CBR

--alt-preset cbr 256


192 kbit/s CBR

--alt-preset cbr 192


160 kbit/s CBR

--alt-preset cbr 160


128 kbit/s CBR

--alt-preset cbr 128

96 kbit/s CBR

--alt-preset cbr 96
All other CBR bitrates from 80kbps to 320kbps
Code:
--alt-preset cbr <bitrate>
Comments
Post a Comment