
# 1 Optimum Bandwidth Settings using Speed Guide
The Speed Guide in utorrent is the easiest way to get right upload and download speed. Press [Ctrl + G] or go to options>speed guide. There you will get a drop downbox which says connection type. It lets you choose your closest connection speed. Then click Use Connection Settings. The maximum number and other settings will be automatically applied.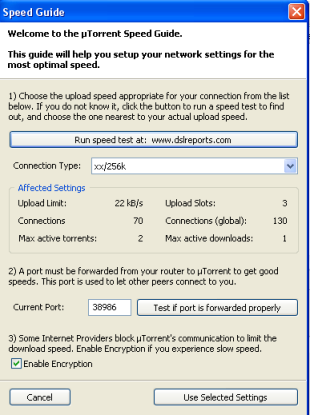
# 2 Setting Up Listening Ports
Since utorrent is a p2p client, thus you need to have open ports which act as entry point for people to get data from you. If you don’t have open ports you won’t get sufficient download rate either.Some ISP’s and routers block.
If you are using routers, set it up to forward the ports on using in utorrent. You can check to find the correct port using the options > speedguide. Enter a port number and check it. It will open up a new web page which can tell if the port is open or not.
If not choose a different port till u find the correct port number. Check the above image for this. If you are using router check this page Routers Port Index , If you want to find out what are the common ports used by other programs, here is the list Cports.
# 3 Encrypting Network Protocol
Similarly some ISP’s try to limit the bandwidth to p2p applications. uTorrent have protocol encryption which makes detection and limiting by ISP’s harder.You can enable protocol encryption by going to Options > Preferences > Bittorrent. There is a section called as Protocol Encryption, choose Enabled or Force. This can speed up your bandwidth.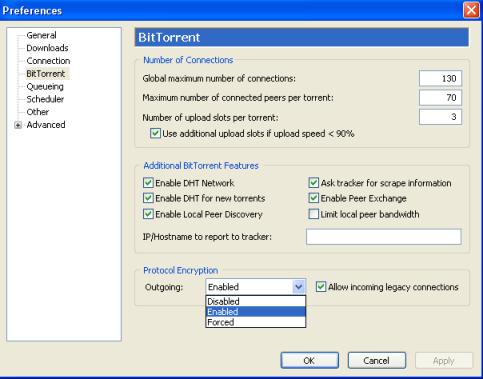
# 4 Removing the Connection Limit for Windows
Here we are going to modify and replace a system file, So do it at your own risk. But its sure does work.First backup your TCPIP.Sys. Now if you are using windows XP SP2 or SP3 , the chances are your “maximum half open connection limit is most likely to 10. There are pacthes availble which can remove this problem. One such patcher is [Here for XP] |[And Here For Vista] . Download the English version and execute the exe in it.
# 5 Using the Web Interface (uTorrent WebUI)
uTorrent has a web interface called as Web UI. This allows you to control uTorrent remotely through a browser. You can do pretty much the same things you can do with the program on your computer.To enable WebUI, go to Options > Preferences > Advanced > Web.
Click on Enable Web interface. Enter username and password. You can download the Web Ui from Here . Download and uncompress the rar file and copy it to Documents and Settings/[Your username]\Application Data\utorrent.
IE sometimes doesnt work with it,So either use opera, Chrome , safari or firefox. Now to access your utorrent from web open url which should be like this http://Machine_name_or_IP:Port/gui . It will ask for user name and password. There you go ….use from anywhere you want
# 6 Settings Download Speed Schedules (Download Schedule)
uTorrent like any other download manager has a scheduler but it goes one step ahead. You can speed limits during certain period of time. To use it go to Options > Preferences >Scheduler. Click on Enable Scheduler. Here you can set Upload and download rate when the schedule is enabled. You can see scheduler table where you can click on any day and give your preferences to Limit, Turnoff or Full speed and set the bandwidth usage. Dark green is full speed, light green is limited speed and white is turned off.
# 7 A Little Test for you
Run this test and follow all the steps it tells you to GREATLY improve your cable/dsl connection.
Under advertised speed, use the max speed you got after taking the speed test. This is only for XP though as Vista have on-the-fly tuning by default.
# 8 TCP Optimizer
Also try TCP Optimizer from SpeedGuide.net. This improves your connection in all aspects.
# 9 Advanced Tweaks
Warning : Read The Setting name and the value to be changed carefully , because a little bit of mistake while tweaking can screw up your current download or upload.
Options -> Preference -> Connection ->
Set the value of Port used for incoming connection to "80" or "443" or "45682" or just randomize it
> Uncheck "Enable UPnP Port mapping" and "Randomize port each start
> Check "Enable NAT-PMP port mapping"
Options -> Preference -> Queueing ->
> Set "Maximum number of active torrents (ul or dl) to "60"
> Set "Maximum number of active downloads to "63"
Options -> Preference -> Bandwidth ->
> Uncheck "Automatic" and set the Upload rate as you wish (In kB/S)
> Set the Global Download Rate Limiting to "0" if you haven't already.
> Set "Global maximum number of connections" to "800" or "1890"
> Set Global number of connected peers per torrent to "125" or "2329"
> Set Number of upload slots per torrent to "14" or "25"
> Check "Use additional upload slots if upload speed < 90%"
Options -> Preference -> BitTorrent ->
> Check "Enable DHT Network" | "Enable DHT for new torrents" | "Enable Local Peer Discovery" | "Ask tracker for scrape information" | "Enable Peer Exchange"
> Uncheck "Limit local peer bandwidth"
> Clear the Box "IP/Hostname to report to tracker"
> Set Protocol Encryption to "Forced" and Check "Allow incoming legacy connections"
Options -> Preference -> Advanced ->
Set the value of the following as given
bt.allow_same_ip = true
bt.enable_tracker = true
bt.no_connect_to_services = false
bt.send_have_to_seed = false
dht.rate = 2
gui.bypass_search_redirect = true
gui.delete_to_trash = false
ipfilter.enable = false
net.max_halfopen = 500
net.outgoing_port = 50
net.wsaevents = 150
peer.disconnect_inactive_interval = 900
queue.dont_count_slow_dl = false
queue.dont_count_slow_ul = false
rss.update_interval = 20
---------------------------------------------------------------------------------------------------------------------------------------------------------------------------------
Some random uTorrent tips
1. Make sure your upload limit isnt set too high. Its recommended you at least seed at half speed or trackers will see you are not seeding enough and may limit your speed.
2. This is obvious but download torrents that have seeds that are more then peers. For example, a torrent with 120 seeders and 80 leechers will perform better then a torrent with 2600 seeders and 4000 leechers.
3. Use an IP Filter to filter out the unwanted IP's such as govt agencies that track your downloads and act as a fake seeder that may affect your download speed. Search for "ip filter utorrent". Google is your friend here
4. NEVER set your download or upload to 0 (no limit). This will bring about undesirable consequences such as unable to surf the web.
5. Some people have reported speed increases by setting the peer.lazy_bitfield setting to false in Advanced Preferences.
6. Some people have reported increased speeds in an older version of uTorrent, namely uTorrent V1.6.
7. Change the Protocol Encryption (Options, Preferences, Bittorrent) to Forced. This will force encryption on all outgoing packets and will not fallback to un-encrypted mode if the peer refuses to co-operate. Good to connect to only encryption-enabled peers. Avoid doing this for torrents with low peers/seeds.
8. Remove the check for "Allow Incoming Legacy Connections" (Options, Preferences, Bittorrent). This will make all your outgoing and incoming packets fully encrypted, except for tracker communications. Peers who are using a torrent software that doesn't support encryption are dropped. Avoid doing this for torrents with low peers/seeds.
__________________________________________________ __________________________________________________ __________________________________
Special TCP/IP Tweak (Updated) for Vista and Windows 7
1. Download patched tcpip.sys: 64-bit tcpip.sys or 32-bit tcpip.sys.
2. Open command prompt, and run the following 2 commands:
Code: Select all
takeown /f c:\windows\system32\drivers\tcpip.sys
cacls c:\windows\system32\drivers\tcpip.sys /G "username":F
Replace username with the actual user name that is currently being used to log on.
3. Disable the TCP/IP Auto-Tuning feature by running the following command in command prompt:
Code: Select all
netsh int tcp set global autotuninglevel=disable
4. For 64-bit Windows Vista / Windows 7 (x64), the integrity checks need to be disabled as it needs all drivers to be signed. So run the following command in DOS prompt:
Code: Select all
bcdedit.exe -set loadoptions DDISABLE_INTEGRITY_CHECKS
5. Replace the tcpip.sys in C:\windows\system32\drivers folder with the patched tcpip.sys downloaded during step 1 (remember to use the correct x64 or x86 version. Normally this procedure can be done by simply logging into Windows Vista / Windows 7 with an administrator account. However, if the process fails, reboot the computer and then press F8 to boot up in Safe Mode, and then copy and paste to overwrite the tcpip.sys.
6. Next, the maximum number of TCP half complete connection limit needs to be set in the registry. Open registry editor (regedit), and navigate to the following registry key:
Code: Select all
HKEY_LOCALL_MACHINE\SYSTEM\CurrentControlSet\Servi ces\Tcpip\Parameters
7. Right click on the right pane, select “New”, then select “DWORD value”. Enter the new value name as “TcpNumConnections” (without quotes).
8. Double click on TcpNumConnections registry value, and modify the value data to the desired maximum TCP/IP connection limit that you want to allow, in decimal value. For example, enter 500 as the value data for TcpNumConnections. You can use any limit that you prefer. Alternatively, download this registry registration file that when executed, will set the TCP simultaneous connection limit to 16777214 (you can always modify the value in the file or in the registry after applied).
9. Restart computer.
Note : However as priorly discussed in this thread , TCP/IP Connection Tweaking effects a little but helps boosting the connection to an optimal level thus almost fully utilizing your connection.
Comments
where is the link for the patch in xp to patch the max tcp.
ReplyDeleteYou dont need any link its all in built in the os, u just need to change the settings. . .
ReplyDelete